Dudes,
In my previous post i was explained about how to read the data from excel sheet and use those in our selenium script. In this post i will explain about how to write the data to a excel sheet through selenium script.
As known by everyone selenium does n't support read/write data from/to external resources like excel, etc. JXL jar file helps to overcome that issue. Jxl jar helps selenium to read/write the data from/to external sources like excel, etc. I would be explaining how could implement this in this post.
Example: (Google search and write the pass fail status to excel sheet)
package excel;
import com.thoughtworks.selenium.*;
import org.testng.annotations.*;
import java.io.FileOutputStream;
import org.junit.After;
import org.junit.Before;
import org.junit.Test;
import static org.junit.Assert.*;
import jxl.*;
import jxl.write.Label;
import jxl.write.WritableSheet;
import jxl.write.WritableWorkbook;
public class write2excel{
private Selenium selenium;
@Before
public void startSelenium() throws Exception {
selenium = new DefaultSelenium("localhost", 4444, "*chrome", "http://www.google.co.in");
selenium.start();
selenium.windowMaximize();
}
@Test
public void testGoogle1() throws Exception{
String s;
selenium.open("/");
Thread.sleep(3000);
System.out.println("Opened");
selenium.type("id=gbqfq", "Software Testing");
Thread.sleep(3000);
System.out.println("Typed");
selenium.click("id=gbqfb");
Thread.sleep(3000);
System.out.println("Clicked");
if(selenium.isTextPresent("en.wikipedia.org/wiki/Software_testing"))
{
s= "Pass";
}
else
{
s="Fail";
}
write(s);
}
@After
public void tearDown() throws Exception {
//selenium.stop();
}
public void write(String t) {
try
{
FileOutputStream f = new FileOutputStream("src\\Resources\\Data\\data2.xls",true);
WritableWorkbook book = Workbook.createWorkbook(f);
WritableSheet sheet = book.createSheet("output", 0);
Label l = new Label(0, 0, t);
sheet.addCell(l);
book.write();
book.close();
}
catch (Exception e)
{
e.printStackTrace();
}
}
}
In the above example following code used to create new excel file and write the data into excel sheet. And isText Present function helps to verify whether the mentioned text or word or sentence present in loaded page. Using that we can find whether the test case is pass or fail.
FileOutputStream f = new FileOutputStream("src\\Resources\\Data\\data2.xls",true);
WritableWorkbook book = Workbook.createWorkbook(f);//Creating the excel sheet
WritableSheet sheet = book.createSheet("output", 0);//Creating work sheet for excel
Label l = new Label(0, 0, t);
sheet.addCell(l);//Adding data to cell.
book.write();
book.close();
Happy Testing guys.
Wednesday, 27 February 2013
Tuesday, 26 February 2013
How to avoid the browser closing after selenium script completed
Hi,
This post is to tell you all that how to avoid browser closing after the selenium script is completed. This is very simple to implement, just comment the selenium.stop(); function present inside @After.
This post is to tell you all that how to avoid browser closing after the selenium script is completed. This is very simple to implement, just comment the selenium.stop(); function present inside @After.
@After
public void tearDown() throws Exception {
//selenium.stop();
}
Happy testing.
Data driven testing using TestNG
Data driven testing is executing the same script with set of multiple data from the external source file. Selenium does not have any inbuilt source for data driven testing to fetch the data like QTP has. To overcome this selenium uses external sources like excel, etc. To achieve data driven testing in selenium through many frameworks. In that TestNG also one of the frameworks which could help to pass the multiple data to a single script.
TestNG is a testing framework which helps for data driven testing with additional some more features that make it more powerful and easier to use. DataProvider is one of the feature which passes the set of data stored in the variables.
Jxl is a java API that enables to read, write, and modify excel spreadsheets dynamically.
Prerequesties:
Steps:
Please look at the following example for data driven testing using jxl and TestNG,
Example: (Searching data in Google)
package google4;
import com.thoughtworks.selenium.*;
import static org.testng.AssertJUnit.*;
import org.testng.annotations.*;
import java.io.File;
import jxl.*;
public class google1{
private Selenium selenium;
@BeforeClass
public void startSelenium() throws Exception {
selenium = new DefaultSelenium("localhost", 4444, "*chrome", "http://www.google.co.in");
selenium.start();
selenium.windowMaximize();
}
@DataProvider(name = "DP1")
public Object[][] createData1() throws Exception{
Object[][] retObjArr=getTableArray("src\\Resources\\Data\\data1.xls",
"DataPool", "imdbTestData1"); // /test1/src/Resources/Data/data1.xls
return(retObjArr);
}
@Test (dataProvider = "DP1")
public void testGoogle1(String search) throws Exception{
selenium.open("http://www.google.co.in/");
Thread.sleep(3000);
System.out.println("Opened");
selenium.type("id=gbqfq", search);
Thread.sleep(3000);
System.out.println("Typed");
selenium.click("id=gbqfb");
Thread.sleep(3000);
System.out.println("Clicked");
}
@AfterClass
public void tearDown() throws Exception {
//selenium.stop();
}
public String[][] getTableArray(String xlFilePath, String sheetName, String tableName) throws Exception{
String[][] tabArray=null;
Workbook workbook = Workbook.getWorkbook(new File(xlFilePath));
Sheet sheet = workbook.getSheet(sheetName);
int startRow,startCol, endRow, endCol,ci,cj;
Cell tableStart=sheet.findCell(tableName);
startRow=tableStart.getRow();
startCol=tableStart.getColumn();
Cell tableEnd= sheet.findCell(tableName, startCol+1,startRow+1, 100, 64000, false);
endRow=tableEnd.getRow();
endCol=tableEnd.getColumn();
System.out.println("startRow="+startRow+", endRow="+endRow+", " +
"startCol="+startCol+", endCol="+endCol);
tabArray=new String[endRow-startRow-1][endCol-startCol-1];
ci=0;
for (int i=startRow+1;i<endRow;i++,ci++){
cj=0;
for (int j=startCol+1;j<endCol;j++,cj++){
tabArray[ci][cj]=sheet.getCell(j,i).getContents();
}
}
return(tabArray);
}
}
Excel data:

@DataProvider(name = "DP1")
public Object[][] createData1() throws Exception{
Object[][] retObjArr=getTableArray("src\\Resources\\Data\\data1.xls",
"DataPool", "imdbTestData1"); // /test1/src/Resources/Data/data1.xls
return(retObjArr);
}
public String[][] getTableArray(String xlFilePath, String sheetName, String tableName) throws Exception{
String[][] tabArray=null;
Workbook workbook = Workbook.getWorkbook(new File(xlFilePath));
Sheet sheet = workbook.getSheet(sheetName);
int startRow,startCol, endRow, endCol,ci,cj;
Cell tableStart=sheet.findCell(tableName);
startRow=tableStart.getRow();
startCol=tableStart.getColumn();
Cell tableEnd= sheet.findCell(tableName, startCol+1,startRow+1, 100, 64000, false);
endRow=tableEnd.getRow();
endCol=tableEnd.getColumn();
System.out.println("startRow="+startRow+", endRow="+endRow+", " +
"startCol="+startCol+", endCol="+endCol);
tabArray=new String[endRow-startRow-1][endCol-startCol-1];
ci=0;
for (int i=startRow+1;i<endRow;i++,ci++){
cj=0;
for (int j=startCol+1;j<endCol;j++,cj++){
tabArray[ci][cj]=sheet.getCell(j,i).getContents();
}
}
return(tabArray);
}
Happy Testing.
TestNG is a testing framework which helps for data driven testing with additional some more features that make it more powerful and easier to use. DataProvider is one of the feature which passes the set of data stored in the variables.
Jxl is a java API that enables to read, write, and modify excel spreadsheets dynamically.
Prerequesties:
- TestNG plug in need to be installed in eclipse IDE. In my previous post i explained about how to configure TestNG with Eclipse IDE.
Steps:
- Open eclipse IDE
- Create new JAVA project
- Create new package under the project
- Create new class under the package
- Add the jxl,TextNG, selenium server, junit jar files in java build path
- Add new folder inside src folder
- Add another folder inside newly added folder
- Create excel file as defined below and save it in finally created folder.
- Type the following code inside the class editor
- Save the project
- Right click on project name and click on Build Project option
- Right click on project name and choose Run as-->click on TestNG test option
Please look at the following example for data driven testing using jxl and TestNG,
Example: (Searching data in Google)
package google4;
import com.thoughtworks.selenium.*;
import static org.testng.AssertJUnit.*;
import org.testng.annotations.*;
import java.io.File;
import jxl.*;
public class google1{
private Selenium selenium;
@BeforeClass
public void startSelenium() throws Exception {
selenium = new DefaultSelenium("localhost", 4444, "*chrome", "http://www.google.co.in");
selenium.start();
selenium.windowMaximize();
}
@DataProvider(name = "DP1")
public Object[][] createData1() throws Exception{
Object[][] retObjArr=getTableArray("src\\Resources\\Data\\data1.xls",
"DataPool", "imdbTestData1"); // /test1/src/Resources/Data/data1.xls
return(retObjArr);
}
@Test (dataProvider = "DP1")
public void testGoogle1(String search) throws Exception{
selenium.open("http://www.google.co.in/");
Thread.sleep(3000);
System.out.println("Opened");
selenium.type("id=gbqfq", search);
Thread.sleep(3000);
System.out.println("Typed");
selenium.click("id=gbqfb");
Thread.sleep(3000);
System.out.println("Clicked");
}
@AfterClass
public void tearDown() throws Exception {
//selenium.stop();
}
public String[][] getTableArray(String xlFilePath, String sheetName, String tableName) throws Exception{
String[][] tabArray=null;
Workbook workbook = Workbook.getWorkbook(new File(xlFilePath));
Sheet sheet = workbook.getSheet(sheetName);
int startRow,startCol, endRow, endCol,ci,cj;
Cell tableStart=sheet.findCell(tableName);
startRow=tableStart.getRow();
startCol=tableStart.getColumn();
Cell tableEnd= sheet.findCell(tableName, startCol+1,startRow+1, 100, 64000, false);
endRow=tableEnd.getRow();
endCol=tableEnd.getColumn();
System.out.println("startRow="+startRow+", endRow="+endRow+", " +
"startCol="+startCol+", endCol="+endCol);
tabArray=new String[endRow-startRow-1][endCol-startCol-1];
ci=0;
for (int i=startRow+1;i<endRow;i++,ci++){
cj=0;
for (int j=startCol+1;j<endCol;j++,cj++){
tabArray[ci][cj]=sheet.getCell(j,i).getContents();
}
}
return(tabArray);
}
}
Excel data:
In the above example following code helped to read the data from the excel sheet and store it in the variable.
@DataProvider(name = "DP1")
public Object[][] createData1() throws Exception{
Object[][] retObjArr=getTableArray("src\\Resources\\Data\\data1.xls",
"DataPool", "imdbTestData1"); // /test1/src/Resources/Data/data1.xls
return(retObjArr);
}
public String[][] getTableArray(String xlFilePath, String sheetName, String tableName) throws Exception{
String[][] tabArray=null;
Workbook workbook = Workbook.getWorkbook(new File(xlFilePath));
Sheet sheet = workbook.getSheet(sheetName);
int startRow,startCol, endRow, endCol,ci,cj;
Cell tableStart=sheet.findCell(tableName);
startRow=tableStart.getRow();
startCol=tableStart.getColumn();
Cell tableEnd= sheet.findCell(tableName, startCol+1,startRow+1, 100, 64000, false);
endRow=tableEnd.getRow();
endCol=tableEnd.getColumn();
System.out.println("startRow="+startRow+", endRow="+endRow+", " +
"startCol="+startCol+", endCol="+endCol);
tabArray=new String[endRow-startRow-1][endCol-startCol-1];
ci=0;
for (int i=startRow+1;i<endRow;i++,ci++){
cj=0;
for (int j=startCol+1;j<endCol;j++,cj++){
tabArray[ci][cj]=sheet.getCell(j,i).getContents();
}
}
return(tabArray);
}
Happy Testing.
Monday, 18 February 2013
Solution for:- Error opening registry key 'Software\JavaSoft\Java Runtime Environment.3'
Hi,
This morning when i try to run the eclipse, i have been turned up into the following error "Error opening registry key 'Software\JavaSoft\Java Runtime Environment.3' ", but java is already installed in my system and what happened now suddenly. Through many sources i found that, it happened due to some unexpected things happened in java registry files. To resolve this issue you either take anyone of the following solution,
Solution 1:
Add the JRE registry entries manually.
[HKEY_LOCAL_MACHINE\SOFTWARE\JavaSoft\Java Runtime Environment]
"CurrentVersion"="1.7"

[HKEY_LOCAL_MACHINE\SOFTWARE\JavaSoft\Java Runtime Environment\1.7]
"JavaHome"="C:\\Program Files\\Java\\jre7"
"RuntimeLib"="C:\\Program Files\\Java\\jre7\\bin\\client\\jvm.dll"

[HKEY_LOCAL_MACHINE\SOFTWARE\JavaSoft\Java Runtime Environment\1.7.0_01]
"JavaHome"="C:\\Program Files\\Java\\jre7"
"RuntimeLib"="C:\\Program Files\\Java\\jre7\\bin\\client\\jvm.dll"
Solution 2:
- Install the latest version of the java or update latest version. Since you would not able to fully uninstall the java, re installation would help to uninstall the old libraries and update with latest.
- Once the installation is completed just restart your system which helps the application to perform effectively.
Thanks.
Enjoy Testing.
Thursday, 14 February 2013
Record the script using selenium IDE plug-in
This post will help the beginner how to record and convert the test case. Before moving into to the steps to record the script make sure Selenium IDE plug-in is installed in firefox browser. Once its done lets begin how to record the script.
Steps to record script using Selenium IDE:


Steps to record script using Selenium IDE:
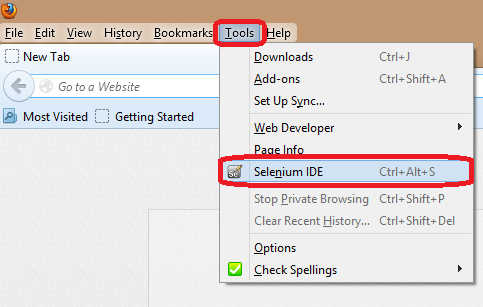
- Open the Firefox browser
- Click on "Tools" tab
- Click on "Selenium IDE" option or use the "Ctrl+Alt+S" to open the selenium IDE
- Selenium IDE will be in record mode once its started
- Open the URL and execute the scenario which need to be recorded
Note: Do not make any other action in firefox while recording the script.
Save and Convert the recorded script:
- Once the scenario is recorded using selenium IDE click on "File" tab
- Click on Save Test case
- Choose the location, specify the name and change the save as type to HTML format
- Click on Save button
- Again click on File tab
- Choose Batch Convert Testcases-->Java/Junit 4/Remote Control
- Choose the script which was saved in HTML format and click on open
- Alert popup will be triggered saying "Converted 1 Test case"
Common mistake which may be done while using TestNG
Hi Folks,
When i move on to data driven testing, TestNG helped for that. As usual i recorded the script using selenium IDE(Firefox Plug-in), save and convert the batch test case using Junit 4. Afterwards just copied the script and paste it in eclipse IDE to implement data driven testing and i am done with the parameterization. But when i start to run the script it got terminated and it not even open the browser but what ever script i have written for parameterization correct. Where i have done a mistake, i was in terrible confusion to resolve the error. Finally i found error where i made, it was just simple but to identify it took a day for me.
What was the mistake: "Forget to remove Junit Statements"

I hope this post would help at least some. Your comments are welcome to improve my blog strategy.
Thanks Folks!!!!
When i move on to data driven testing, TestNG helped for that. As usual i recorded the script using selenium IDE(Firefox Plug-in), save and convert the batch test case using Junit 4. Afterwards just copied the script and paste it in eclipse IDE to implement data driven testing and i am done with the parameterization. But when i start to run the script it got terminated and it not even open the browser but what ever script i have written for parameterization correct. Where i have done a mistake, i was in terrible confusion to resolve the error. Finally i found error where i made, it was just simple but to identify it took a day for me.
What was the mistake: "Forget to remove Junit Statements"
I convert the test case using junit but in the script i was using TestNG framework. In the converted script by default Junit import statements were added, I forget to remove those statements. So when i started to run the script it started using Junit framework to run the script even if i run it using TestNG. So make sure you were removed the Junit statements before running the TestNG script.
Thanks Folks!!!!
Wednesday, 13 February 2013
Configuring Testng with Eclipse IDE
Following blog will help you to configure/install the TestNG plug-in to you eclipse IDE. TestNG helps to do data driven testing in selenium.
How to install TestNG with selenium:


How to install TestNG with selenium:
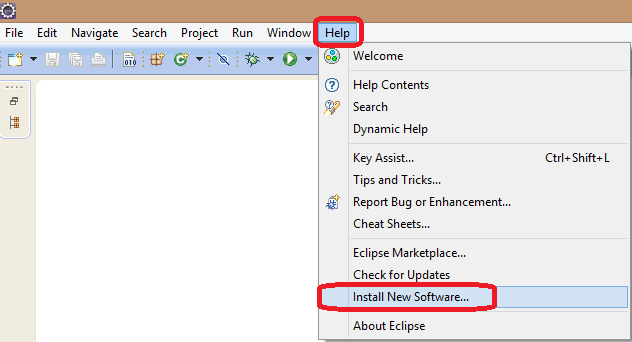
- Open the eclipse IDE
- On help tab click on "Install new software". (Refer Fig 1.1)
- On "Install" popup click on "Add" button against work with field. (Ref Fig 1.2)
- Specify the Name. (Ref Fig 1.2)
- Provide the following URL "http://beust.com/eclipse/" (You could find which URL to be used in the following URL "http://testng.org/doc/download.html"). (Ref Fig 1.2)
- Latest version of TestNG plug-in information will be found below "Work with" field
- Select the check box against the plug-in. (Ref Fig 1.3)
- Click on "Next" button. (Ref Fig 1.3)
- Choose the name and click on "Next" button. (Ref Fig 1.4)
- Choose the "I accept the terms of the license agreement" radio button. (Ref Fig 1.5)
- Click on "Finish" button. (Ref Fig 1.5)
- Once TestNg installed it will ask you to restart the Eclipse IDE.
Fig 1.1
Fig 1.2
Fig 1.3
Fig 1.4
Fig 1.5
Thank you buddies.
Thursday, 7 February 2013
Selenium testing trust SSL certificate warning problem while running the class
Hi,
Recently i worried to resolve SSL certificate warning problem while running the script in eclipse IDE. Many browsers will throw a SSL certificate warning message while entering into https site pages. When i record the script using selenium IDE i dint find any kinda SSl certification warning through selenium IDE, but when i try to run script using eclipse IDE, SSl certification warning is shown and stopped running the script. To avoid this issue "-trustAllSSLCertificates" command need to included while running the selenium server.
Steps:
- Open the command prompt
- Include the location in command prompt where the selenium server jar file is loaded
- Start the selenium server using following command line
- "java -jar selenium-server-standalone-2.28.0.jar -trustAllSSLCertificates"
Thats it!!!
Batch convert testcases/script issue in selenium IDE 1.10.0
Hi,
After successful start in selenium training. Started to record the script using selenium IDE. Once done with the recording i struggle to convert the recorded script to use it in java eclipse IDE for further modifications. Later i found that there were no batch convert test cases and batch convert test suits present in selenium IDE 1.10.0 version. I was confessed and was looking how can i resolve this issue. After some point of time one of colleague who helped me to solve this issue by adding an plug-in/add-on to the Firefox browser.
Steps to resolve batch convert test cases and batch convert test suits issue:
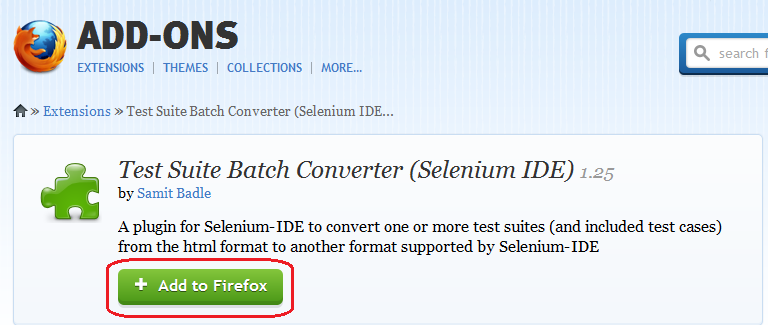
- Open the Firefox browser
- Google Test Suite Batch Converter or open the https://addons.mozilla.org/en-us/firefox/addon/test-suite-batch-converter-sel/ URL
- Click on Add to Firefox button
- Click on "Install" button once its enabled
- Restart the Firefox
Thanks.
Selenium and Eclipse IDE installation Guide
Hi Folks,
Hope everyone doing great. This is my first blog post and i am not good in english, so please forgive for my poor english.
After having two and half years of experience in manual testing, just planned to learn selenium automation with the help of one of my colleague. Before starting selenium automation i dint aware that selenium IDE is an add-on of firefox browser and which help to record and replay the scripts. So this post will help the beginners to how to install both selenium IDE and eclipse IDE. Eclipse IDE helps the user to edit and make changes in recorded script where as selenium IDE is only used to record and replay the recorded script.
Installation steps for Selenium IDE:
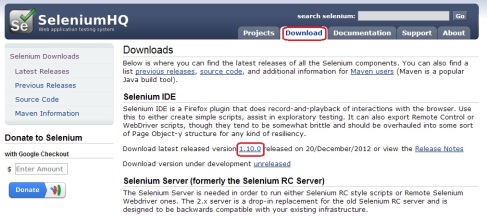
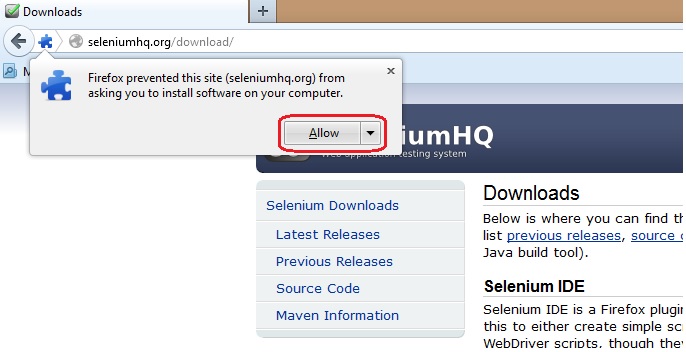
- Open the http://seleniumhq.org/ URL in Firefox browser
- Click on Downloads tab
- Click on the latest version inside selenium IDE
- Authentication popup will be populated and click on "Allow" button

- From the installation popup click on "Install" button once its enabled
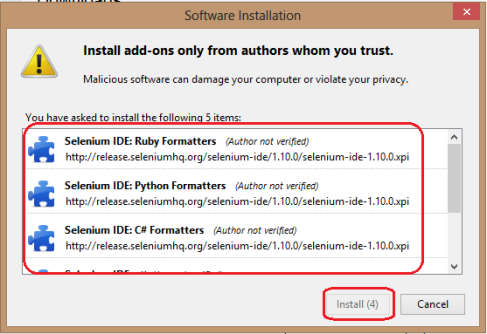
- Restart the fire fox browser once the installation is completed.


Installation steps for Eclipse IDE
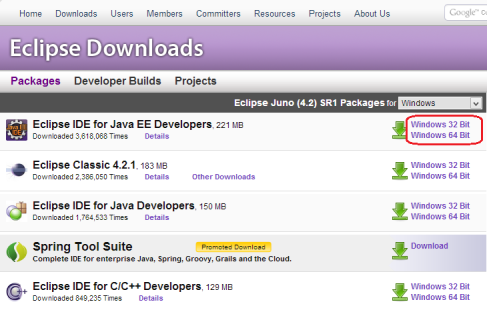
- Open the http://www.eclipse.org/ URL in any browser
- Click on Downloads tab
- Click on the windows 32 bit/windows 64 bit option against Eclipse IDE for Java EE Developers which ever is suite for your desktop
- Click on the download icon or download using any other mirror listed below.
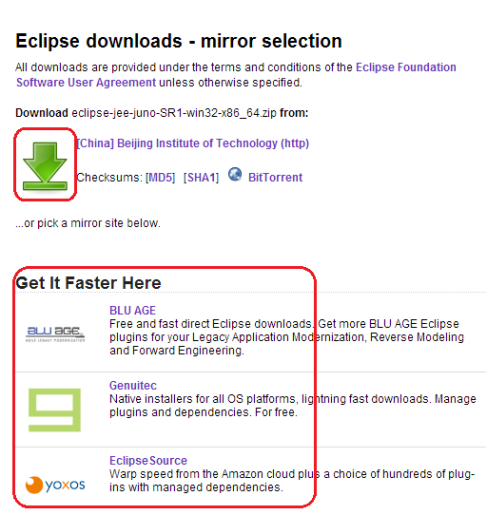
- Open the containing folder where the eclipse IDE were downloaded
- Extract the zip folder
- Copy and paste the eclipse folder anywhere.


I hope this would help someone who really worried about.
Thanks and will meet you all in my next post.
Subscribe to:
Posts (Atom)